I’ve been searching for a solution to boost the APRS signal on my HT when going for a hike. The idea is to setup a portable fill-in digipeater in the car which would pass my APRS signal from my HT to a nearby internet gateway (I-gate) or a distant digipeater that my HT cannot reach. Now I don’t recommend you go out and buy an Icom 705 just for this project as there are more affordable options available. Frankly I’m not sure I’d want to leave my expensive 705 in the car for both heat-related and theft issues. However, if you already have an Icom 705 and a Raspberry Pi, this makes for a fun little project. The fact that you can utilize the 705’s GPS and built-in sound card all with one USB cable is amazing to me.
Gear
To get started, you will need the following hardware to get started.
(Note: Some of these links are affiliate links (Amazon) that support my website and content creation at no additional cost to you.)
- Icom IC-705 QRP HF/VHF/UHF portable radio: Amazon | DXE | GigaParts | HRO | MTC | R&L
- Raspberry Pi 4 Kit or Raspberry Pi 5 Kit (the kits includes the microSD card, case and power supply.)
Note: I tried this project on a Raspberry Pi Zero 2W but there were some extra steps and gear needed to make it work properly. So for now I’m recommending you get the Pi 4 or Pi 5 for this project. Also, if you have a Micro Center nearby, you can build out the Pi individually a bit cheaper than buying a kit. - Anker 25,000 mAh Powerbank
- USB-C to USB-C cable for connecting to power bank (the one above has one built in)
- USB-A male to microUSB cable with ferrite core to reduce interference
- USB microSD card reader
- Dual Band 2m/70cm antenna
- SO239 to BNC adapter cable
I will be using this Pi in a headless environment. Basically that means that once I have it setup, it will not be connected to a keyboard or monitor. For the software, I’m going to be using the Raspberry Pi OS Lite 64-bit version. I find that it uses less resources on the Pi than using the full desktop operating system. The easiest way to install it is to use the Raspberry Pi Imager software. It is available for Windows, Mac and Linux.
Raspberry Pi Imager: https://www.raspberrypi.com/software/
I have another tutorial that shows how to install the Raspberry Pi OS Lite operating system if you’ve never done it before.
Raspberry Pi OS Lite 64-bit installation tutorial
Once you have the operating system installed, you can access it either via plugging it in to a keyboard and monitor or preferably remote into via SSH like I do in the video above. That will require you to know what the hostname or IP address of your Pi is. If you don’t want to mess with that, then just use a keyboard and monitor.
Note: Throughout this tutorial you will see commands in white with a black background. If you’re using SSH, you can just copy and paste these commands into the window and it will make things go a lot faster than typing everything in manually. Also, when you use the sudo command it will prompt you for your password.
Icom 705
There are a couple of things to do on the Icom 705 before we get started.
- Plug in the micro USB cable from the 705 to the Raspberry Pi.
- Set the frequency on the 705 to 144.390 MHz. (or whatever the APRS frequency is in your country)
- Change the mode to FM or FM-D mode. (it works for me on either mode)
- Hold down the lock button to lock the dial knob so you don’t accidentally go off frequency.
- Menu – Set – Connectors – Mod Input: Change the DATA OFF MOD and DATA MOD to USB.
- Menu – Set – Connectors – USB (B) Function – GPS Out – ON
- Menu – Set – Connectors – USB (B) Function – USB (B) Function – OFF
- Menu – #2 – GPS – GPS set – GPS Select – ON
- Menu – Set – Function – Time-Out Timer (Change it to 3 minutes in case the transmitter gets stuck)
- Menu – Set – Display – Screen Saver (Battery Pack) or Screen Saver (DC 13.8V) if you’re on external power – Set it to 1 min so the display doesn’t drain your battery.
Update the Pi
Before we begin, it’s best to check for any updates to your operating system. Even after a fresh install of Raspbian, there are usually updates. The command below is really three commands combined into one line. It checks for updates, installs them and then reboots the Pi.
sudo apt update && sudo apt upgrade -y && sudo rebootAfter the Pi has rebooted, connect back up to your Raspberry Pi.
Disable HDMI audio
In preparing this tutorial, I encountered issues between the audio from the HDMI ports and the Icom 705 sound card. So, I decided to disable the HDMI audio which you don’t need for this project.
sudo nano /boot/firmware/config.txtArrow down until you see the line that says dtoverlay=vc4-kms-v3d. Using the right arrow on the keyboard, move the cursor to the right of the d at the end of the line and type in ,noaudio so it looks like this below.
dtoverlay=vc4-kms-v3d,noaudioDo a CTRL-X, Y and then enter to save the file. Then reboot your Pi for the changes to take effect.
sudo rebootAfter the Pi has rebooted, connect back up to your Raspberry Pi.
Prerequisites
First we need to install some prerequisite programs to help us compile the software and other utilities for down the road.
sudo apt-get install -y automake libtool texinfo git cmake libasound2-dev libudev-dev libavahi-client-dev tmux libgps-dev scons libncurses-dev asciidoctor GPSD
We are first going to install the GPS software so we can access the built-in GPS data on the 705. This will come in handy for both APRS reasons and if you want to use it to set the date and time on your Pi without internet. Due to some bugs in the prepackaged version, we need to compile gpsd from source code.
Visit the gpsd website and find the latest version. It is 3.26.1 as of the time of this post.
https://download.savannah.gnu.org/releases/gpsd
Use the following command on your Pi to download the source code. (grab the one that ends with .tar.gz)
wget https://download.savannah.gnu.org/releases/gpsd/gpsd-3.26.1.tar.gzThen we need to extract the file.
tar zxvf gpsd-3.26.1.tar.gzNow we will change into the newly created directory.
cd gpsd-3.26.1The next commands will compile the gpsd software into a program that we can run. This may take a little bit of time.
sudo scons && sudo scons check If everything was successful, you can install the compiled program using this command.
sudo scons installThis will install the service that will autostart gpsd when the Pi is powered on.
sudo scons udev-installNow we need to make the shared libraries quicker to find by caching the information.
sudo ldconfigTime to change back to the home directory
cdWe need to find the name of the device that your 705 uses for GPS.
ls -la /dev/serial/by-id/Mine shows the following but the eight numbers towards the end will be a bit different.

Now that we have that, we will need to edit the configuration file for gpsd to configure a few things.
sudo nano /etc/default/gpsdInside the editor, you will want to delete whatever you have in there and copy/paste what is listed below into the file. Pay close attention to the DEVICES line and make sure the eight numbers match what you discovered above. Use the one that ends with if02. Then save the file by hitting CTRL-X, type Y to confirm and hit enter when it asks the file name.
START_DAEMON="true"
USBAUTO="true"
DEVICES="/dev/serial/by-id/usb-Icom_Inc._IC-705_IC-705_12011195-if02"
GPSD_OPTIONS="-n"
Now we need to enable the gpsd service to start when the Pi is powered on.
sudo systemctl enable gpsd.serviceNow we can start the gpsd service.
sudo systemctl start gpsdNext we’re going to see if the Raspberry Pi is seeing the GPS data from the Icom 705.
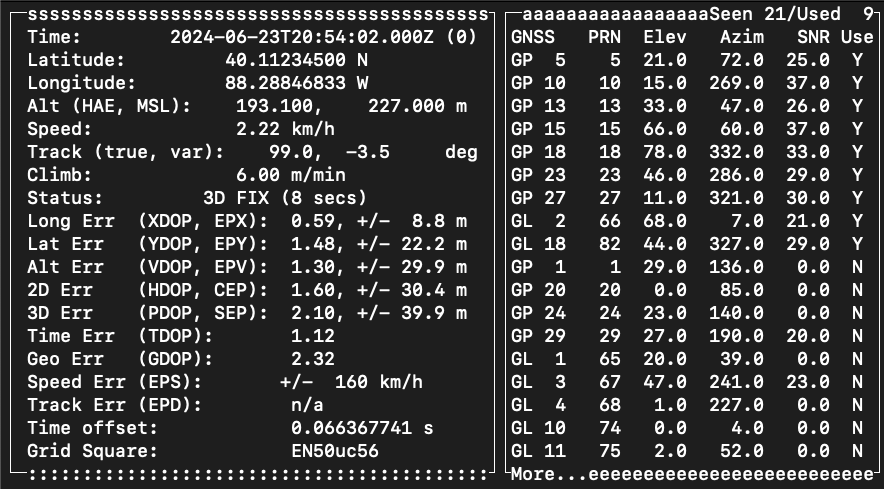
cgps -sIf you have a GPS signal on your Icom 705 and everything is configured correctly, you should see a screen with lots of data on it like the one below. The data on the left is your specific date/time, location, elevation, time difference between the satellites and your Pi as well as your maidenhead grid square. On the right side is every satellite that your Icom 705 is seeing and how strong the signal of each one is. Pretty sweet! You can hit the Q button to quit out of cgps.
Chrony
Unless you have a Raspberry Pi 5, the Raspberry Pi does not come with a real-time clock built in. Usually this isn’t a problem because the Pi usually syncs the time from the internet when it boots up. However, if your Pi isn’t connected to the internet then it can’t update the date and time. That’s where the beauty of the GPS from the Icom 705 comes in. We can take the date/time from the satellites and use it to set the date and time of the Pi with no internet required.
Before we do that, we need to install the Chrony program which will talk to the GPS to set the time.
sudo apt install -y chrony Then we need to edit the Chrony config file to add the commands that will use the GPS as a time source.
sudo nano /etc/chrony/chrony.confCopy and paste the following at the end of the file. Save the file by doing a CTRL-X, Y and Enter.
#GPS
refclock SHM 0 refid GPS poll 2
Restart the Chrony process for this to take effect.
sudo systemctl restart chronyNow run this command to see if the GPS shows up in the list of sources. It might take a minute for it to change. Basically you want the #? in front of GPS to change to #*.
chronyc sources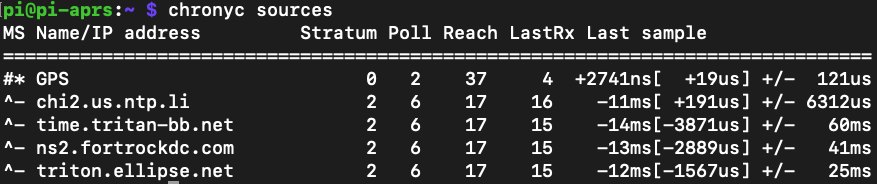
Hamlib
Next we are going to install the hamlib software. This will help the Pi better integrate with the Icom 705. Due to the outdated version of hamlib, we will need to compile it from the source code.
git clone https://github.com/Hamlib/HamlibNow we will change into the Hamlib directory.
cd HamlibThis will create the configuration files we need to help us compile the software.
./bootstrapThis command checks to make sure we have all the components in place to compile.
./configure --prefix=/usrNow we start the compile process. This might take a little while.
makeThis checks to make sure everything compiled correctly.
make checkNow that the software is compiled, we need to install it.
sudo make installIf everything worked correctly you shouldn’t see any errors. Type in the command below to get back to the main directory before proceeding to the next installation steps.
cdDirewolf
Next we move on to installing Direwolf which is the brains of the APRS operation. Like we did with Hamlib, we will be installing this from source code as well. Run each command one at a time.
git clone https://www.github.com/wb2osz/direwolf.gitcd direwolfmkdir build && cd buildcmake ..make -j4sudo make installmake install-confcdNow we need to configure Direwolf so it knows how to talk to the 705.
nano /home/pi/direwolf.confThe first thing is to look for the MYCALL line and change the call after it from N0CALL to whatever your callsign is. If you’re going to use an SSID then you would add it here. So if your call was W1AW and you wanted an SSID of 1, you would enter MYCALL W1AW-1.
The rest of the commands we are going to add at the very end of the file. These commands tell the Pi how to communicate with the radio and GPS. It also sets up a beacon to ID your station every half hour. You can customize this however you want but this is how I’ve got it setup. So you can either use the arrow keys to get to the bottom or the quicker way is to use the page down button until you’re at the bottom. Copy and paste everything in the box below into your direwolf.conf file. Make sure you use your specific path that we ran earlier using the ls -la /dev/serial/by-id/ command for the line starting with PTT. (you want the one ending in if00) Save the file by doing a CTRL-X, type Y and hit enter on the file name.
ADEVICE plughw:1,0
GPSD
PTT RIG 3085 /dev/serial/by-id/usb-Icom_Inc._IC-705_IC-705_12011195-if00
DIGIPEAT 0 0 ^WIDE1-1$ ^WIDE1-1$
TBEACON delay=01:00 every=30:00 symbol=1# via=WIDE2-1 comment="Portable WIDE1-1 digipeater"
Next we need to setup Direwolf so it can start when you boot up the Pi.
sudo nano /etc/systemd/system/direwolf.serviceThis is a new file so just copy and paste everything in the box below into the file. If you’re using a different home directory than the default Pi, then you’ll need to update this in the file. Once it’s in there, do a CTRL-X, type Y and hit enter for the file name to save.
[Unit]
Description=Direwolf
After=network.target

[Service]
Type=forking
#Modify the end of the line below to fit your own needs i.e path to your configuration file
ExecStart=/usr/bin/tmux new-session -d -s direwolf '/usr/local/bin/direwolf -c /home/pi/direwolf.conf'
Restart=always

[Install]
WantedBy=default.target
Now run the following command to enable the Direwolf service.
sudo systemctl enable direwolf.serviceGo ahead and reboot the Pi.
sudo rebootAfter you log back into your Pi, run this command to show you what is happening with the digipeater.
sudo tmux attach -t direwolfIf everything worked correctly, you should see your digipeater retransmitting any WIDE1-1 traffic that it hears. If you see a warning in Direwolf saying GPS timeout, just give it a minute or two and then you should see something like “Location fix is now 3D”.
Read-only mode
Since the Raspberry Pi doesn’t have a power switch, it’s not a good idea to constantly remove power from it without shutting it down. If you do that, the microSD card will get corrupted and you’ll have to start all over. You could setup a mini network and remote in and send the shutdown command each time, but I have a different solution. We can force the Pi to boot up in read-only mode. This will keep it from writing to the microSD card so abruptly pulling the power won’t give the card heartburn.
Remote in to the Pi and run the following command.
sudo raspi-configChoose Performance Options (#4) and then Overlay File System (P2). It will ask if you would like the overlay file system to be enabled, select yes. If successful, it will say the overlay file system is enabled. Select OK to move to the next screen. It will then ask you to write protect the boot partition. Select yes and it will say the boot partition is read-only. Select ok, finish and then yes to reboot the Pi. If you need to make changes in the future, you can reverse this process and enable it again when you are done.
Ready to deploy
You should now be ready to deploy your portable APRS digipeater. This was a lot so if something doesn’t work on the first go around, double check your commands. The smallest typo can break the whole thing. If you are still puzzled, please reach out to me and I will try to assist as best I can. Again, there are much cheaper ways of making a digipeater, but I thought this was a fun project since the Icom 705 can provide radio control, audio and GPS all via one USB cable. If you end up deploying your 705 as a temporary APRS digipeater, I’d love to hear how you used it. Thanks for following along on this tutorial!
Video
I also have a video tutorial that follows this blog post if you want to see how things look as you’re installing everything.