C.Crane CC Skywave SSB AM/FM/AIR/WX/SWL receiver

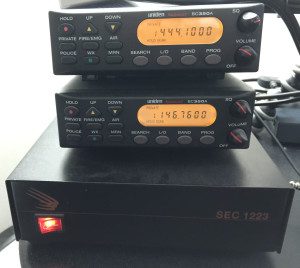
I’ve always had a passion for listening to distant stations. It’s a big reason I eventually got into ham radio. Of course growing up there were a lot more shortwave stations out there than today, but there are still a few stations out there. The only shortwave receiver I have had since I was a teenager was my Radio Shack DX-392. I always use to take it with me to my grandma’s house and would listen to it for hours. (no smartphones or iPads back in those days!)

I still have the receiver today but it doesn’t seem to receive very well in my apartment. (not much does with all the electronics and RFI floating around) Still, I wondered if there was something newer that I could get that might work a little better. As you can see from the photo above, my DX-392 is huge and somewhat bulky to carry around. I wanted something a little smaller that I could take anywhere and enjoy listening to various signals. I researched the crap out of various shortwave receivers out there and was overwhelmed at what to get. I had to really ask myself what I wanted in a new radio. Size was the first priority but I didn’t want to give up performance.

I looked at the popular Tecsun models out there which everyone seems to really enjoy. I wasn’t sure but there was something about them that didn’t seem to be a fit for me. Maybe it was the weird signal strength display or the quirky undocumented features. Somehow I ended up looking at the C.Crane Skywave radio that was going for around $90-100 online. Everything about that looked great except no SSB. Being a ham, I like to listen to various digital and voice signals so this was a deal breaker to me.

As I was doing more reviews, I stumbled across a blog post over at The SWLing Post about a new radio from C.Crane with SSB. I went to the C.Crane website and investigated the CC Skywave SSB further. Not only did it have SSB on shortwave, but it also had the aviation band and NOAA weather radio frequencies.

Everyone seemed to be complaining more about the price than anything else. It was going for $169.99 though was on sale (and still is at the time of this post) for $149.99. Apparently they didn’t think the simple addition of SSB was worth almost doubling the price of the radio. Bah! Just take my money already! 🙂 I ordered the radio along with the power cord and some rechargeable AA batteries. I think I spent more time reading through their shipping policies which made me splurge for 2-day shipping as I didn’t want to wait forever to receive it.

Two days later I did in fact receive the radio. As soon as I opened the box I couldn’t believe just how small the radio was. I snapped a picture of it side by side with my DX-392 radio and it’s crazy how small it is. In the box they included one of those shortwave antenna reels that clips on to the telescoping antenna as well as some earbuds. The radio has a regular mini-usb for power/charging so if you have one of those laying around you can charge it that way too. (or charge the AA’s outside of the radio)

Ok that’s great and all but what does it sound like? First off I tried the shortwave bands and trusty WWV. I never expected to pick it up on the built in antenna but I did. I switched to the ham bands and was able to pick up lots of CW signals as well as a few voice stations. The filter choices are pretty nice as it goes from 6 khz all the way down to 500 hz which helps for those digital signals.

SSB: 4khz, 3khz, 2.2khz, 1.2khz, 1khz, 0.5khz
AM: 6khz, 4khz, 3khz, 2khz, 1khz

As for as tuning, there is a slight muting every time you turn the dial or press the up/down keys. I think that is normal with most shortwave radios including my old DX-392. You can switch to a slower 1khz tuning by gently pushing in on the tune knob. There is also a fine tune button when in SSB mode which acts like an RIT button in the ham world. It tunes in 10 hz steps to really tune in the signal which is great for ham conversations slightly off frequency.

A few notes about SSB mode. Yes, it has both LSB and USB! It takes a few seconds to engage once you press the SSB button. Also, I noticed on CW signals that there is a warble sound like the frequency isn’t stable. Not a big deal but just wanted to mention it.

Broadcast FM stations sound great too. It does not have RDS which was something I wanted but gave up for all the other features but I can live without that. The airband hasn’t impressed me much though we don’t have too much air traffic in the area. I can pick up the ATIS weather but the audio is really low. I’m not sure if that’s the signal itself or the radio just having low audio on that band. It’s not a big deal as I don’t monitor the air bands much anyway but just wanted to point it out.

The NOAA weather band works great and picked up the local station full scale no problems. It does have a weather alert feature, but it’s very basic and only works for 4, 8 or 16 hours. I think it’s meant more for people traveling or hiking to temporarily alert them vs a 24/7 alert feature you’d get in a dedicated weather radio.

The surprising band I’m really enjoying is the AM broadcast band. It really comes alive at night when some stations can run more power. I live in downstate Illinois and have consistently picked up WLW-700 in Cincinnati, Ohio, WSM-650 in Nashville, Tennessee, CJBC-860 in Toronto, Canada and even WCBS-880 in New York! This is all using the internal antenna inside of an apartment. A lot of stations have noise on the signal but if you turn the radio one way or the other it often nulls out the noise which is awesome. Since it’s so small and portable, you can move it around and find the best position for the particular station you are trying to receive.

As for battery life, I don’t think you’ll have to worry about running out. Even with the backlight on, it should last you a long time. I haven’t run it down yet and only charged it once. That is a lot better than my DX-392 which requires 3 AA batteries to store the memories and 4 D batteries to actually power the thing. The CC Skywave SSB only takes 2 AA batteries. The manual states around 60+ hours of battery using speaker and 70+ hours using the earbuds.

So if you are in the market for a very portable radio that does AM/FM/AIR/WX/SWL with SSB then I would definitely recommend this radio. I’ve had a lot of fun with it and can’t wait to take it with me wherever I travel.

More info/Purchase: C.Crane CC Skywave SSB radio

Samlex 1223 power supply noise

samlex1223-2

I’ve had a Samlex SEC 1223 – 23 amp power supply for many years now and it has always made a strange noise. I have two Uniden BC350A scanners hooked up to it that I use to stream local repeaters to Radio Reference / Broadcastify.

I decided to record the noise with my digital audio recorder so I could get some feedback from others on what it might be. It starts in the off position and then you hear me flip the switch on and then off again. (ignore the background noise of my furnace)

If you have any ideas what it is or how to fix it, please let me know. Thanks!

Icom 880H D-STAR radio GPS setup

Garmin GPS 18x PC
I’m slowly rebuilding my ham radio shack after getting rid of everything a few years ago. One of the things I missed the most was the trusty dual band rig in the car. I decided to sell my iPad to help fund the radio purchase. I couldn’t afford a brand new rig, so I looked at the ham classified sites to see what was available. I settled on the Icom 880H 2m/70cm mobile rig. One thing that intrigued me about this setup was the fact that it has D-STAR capability built into it. We have a growing D-STAR network here in Illinois so it seemed like a good idea to have a radio with D-STAR.

When I got the rig, I tried programming a few repeaters in manually just to see if I could do it. The analog frequencies weren’t too difficult, but D-STAR was a bit more difficult. I figured it would be a good idea to program it with the computer, so I ordered the OPC-1529R data cable. I know most folks prefer the RT Systems software, but I decided to try the free Icom programming software instead.

It’s a pretty basic program, but it gets the job done. The problem is there is no way to directly import frequencies from sites like RepeaterBook and RFinder. There is another free programming software called CHIRP that lets you import from these sites. However, getting it from CHIRP into the Icom software is very clunky.

I finally decided to go to the Illinois Repeater Association website and copy/paste the repeaters into a text file. I then opened it in a spreadsheet program called LibreOffice Calc (Microsoft Office works as well) which then lets me sort and filter by regions of the state. Now this still doesn’t let me import into the Icom software. I ended up putting the spreadsheet on one side of my screen and the Icom software on the other and manually typing in the repeaters that I wanted. It’s a time consuming process but at least I can put the frequencies where I want them in the radio.

I have the radio plugged into my Comet CA2X4SR dual band antenna mounted on the door with a Diamond K400 mount. I’ve had this antenna hooked up to other radios over the years and it works great with the 880H. Another nice thing is the radio has a weather alert that lets you know when bad weather is approaching. It also scans air frequencies which are fun to listen to once in a while.

One thing I’ve missed that my old Kenwood D700A had is the APRS functionality. There is a way to get your position on the Icom 880H to the APRS network, but you need to add a GPS to the radio. (most of the other D-STAR radios have GPS built in) I chose the Garmin GPS 18x PC for my setup. It’s a very basic GPS unit with a 12v cigarette plug and 9-pin serial port on it. You hook it up to the Icom 880H with a null modem adapter.

There’s a few things in the radio you need to change before the GPS will work. The first is the data speed which defaults to 9600 bps. You need to change it to 4800 bps for it to work with the GPS 18x unit. Go into the SET menu, then FUNC and then SPEED and change it to 4800. If everything is hooked up properly, you will see the GPS indicator in the top right start blinking indicating it sees your GPS. When it has acquired a good satellite lock, the indicator will stay on.

Another thing you need to change for it to work with APRS is the GPS-TX mode. It defaults to DVG, but needs to be on DVA. It’s in the GPS –> GPS-TX menu. Inside that menu you’ll also want to change your symbol (the icon that shows up on the APRS map), add a comment and enable the direction/speed (DT EXT –> CUR.SPD) if you want that to show up.

You can see my position on the APRS network:
http://aprs.fi/#!call=a%2FK9SWX

Please note that your position will only show up on APRS when you push the PTT button on the microphone. You can set it up to automatically send it every so often, but that is highly frowned upon. (especially if the repeater is linked to a reflector or another repeater.)

I’ve put together a little video about my Icom 880H. Check it out and let me know what you think!

Parts list

    • Note: Some of these links below are affiliate links which means if you purchase the item I will get a commission from the sale.

Please let me know if you have any questions about all of this. Thanks! 73..

Stan – K9SWX

Yaesu VX-8R audio fix

I’ve had my Yaesu VX-8R HT for about a year and a half now. It’s been a nice little radio except for an annoying issue with the audio. When pushing buttons, the audio sounded weaker and scratchy. I noticed that pushing down on the speaker improved the quality. I’ve lived with it for all this time and finally had enough.

I started browsing various internet forums and ran across a solution that seemed to fix the problem. It appeared to be a simple fix which required no soldering and very little tools.

The author of the article posted a nice video on YouTube showing the steps he performed to fix the same problem on his HT. The basic solution was to slightly bend the speaker contacts on the main board of the radio so they would make a better connection with the speaker on the front of the case.

I figured I’d give this a shot. I dug out my small tip screwdrivers and followed his steps to open up the radio. I adjusted the contacts and put the radio back together. I felt energized until I turned the radio on and it said ‘Clone’. At this point I was thinking I had damaged something on the board. I took a deep breath and dug back into the radio again. I bent the contacts down a bit just to make sure they weren’t touching something else on the radio.

I put it back together and turned the radio back on. It came up normally this time. I pushed a ton of buttons and the audio was perfect, no scratchy audio this time. Yay!

I did take a few pictures while I had the radio apart just for kicks.

Total credit goes to the unknown author’s detailed description and YouTube videos from the forum below.

Source: Worldwide DX Amateur Radio Forums (unknown author)

Have you experienced this issue? Did the solution described above fix your problem? Let me know in the comments section.

Yaesu FT-857D Mobile Installation

Over the years I have tried to find a solution to get a decent HF solution into my car. I started with a Radio Shack HTX-10 10 meter rig, but the sunspots and mag mount antenna did not yield much of anything. I also had an Icom 706 hooked up to a ham stick / tuner, but that didn’t work very well either. Since moving a few years ago, I have been unable to install anything at home due to antenna restrictions so HF operation has been impossible. I even tried a Yaesu FT-817 QRP rig indoors with various antennas, but there was just too much noise to hear anything. Was I completely out of luck for HF?

A few weeks ago I decided to sell my FT-817 and accessories to help fund a new radio/antenna. I ended up choosing the Yaesu FT-857D and the ATAS-120A mobile antenna. Now I know there are limitations to this antenna as well as it being a little more expensive than a hamstick, but I had to give it a shot. Everything in the past has been a painful time consuming process just to get on one band, let alone trying to switch between bands quickly. I wanted something that would be as easy as turning on the radio and getting on the air. Would this setup disappoint me as well?

Diamond K400C trunk mount

I chose the recommended Diamond K400C trunk mount which doesn’t require any drilling. I wasn’t sure how well this mount would work as all my other mounts have been magnet mounts. Obviously with this antenna being a little heavier and taller than most dual band antennas, a regular mag mount wouldn’t work. I installed it on the drivers side of the trunk and ran the cable in through the backseat with all my other cables. As for the radio, I mounted on the floor board behind the passenger seat with my other radio. I use the word mounted loosely as it’s really just velcroed but it’s not going anywhere.

The radio came with the separation kit, so that saved me some money. I currently have the faceplate mounted on a vent mount above my XM radio on the dash. I’m really not impressed with this type of mount as it moves around too much, so I will look for a different solution. The microphone and speaker are loosely mounted so I can hide them away when I’m done using them. The power cord is run directly to the battery through the firewall.

Yaesu ATAS-120A
Yaesu ATAS-120A

When I first turned the radio on, I was a little overwhelmed by all the menu settings. However, after thumbing through the manual I became a little more familiar with them. I found the setting to enable the ATAS-120A antenna and hit the tune button. The first time you run it, it takes a few minutes to initialize but after that it’s pretty quick. I flipped through all the bands and it was able to establish a 2:1 or less SWR every time even on the WARC bands. (according to the built-in SWR meter anyways) I tuned around the bands and was hearing numerous signals, so that was another promising discovery.

I decided to visit a local park about 8 miles NW of town which would hopefully get me away from most of the noise of the city. The Michigan QSO party was going strong and I thought I’d try responding to one of them just for kicks. NV8N was coming in pretty strong on 40m so I threw out my call running 50 watts. He heard me on the first try which threw me off guard as I had no idea what the exchange for the contest was. 🙂 Luckily he was patient and explained what info he needed from me and like that my first contact had been made! Not too shabby I thought.

I continued scanning around the bands and landed on 17m. I heard ON4HIL calling CQ, so I tried calling him. It took numerous tries as others were calling and the band was up and down, but I eventually got him. He gave me a 5×2 report and said that wasn’t too bad for my 50 watts. After the brief QSO, I looked up the prefix on my phone and discovered he was in Belgium! I know for most hams with big stations at home this would be boring, but for me to work another country in the mobile with 50 watts is pretty darn cool to me. I was actually quick enough to record the QSO on my phone just so I had proof of the contact.

ON4HIL
04-17-2010-ON4HIL

Later that evening, I went for a drive and tuned around on 40m. I noticed that the Ontario QSO party was also going on. I managed to work several stations while I was driving, so that was pretty cool despite the increased noise from the car. I managed to snag a recording of the QSO with VA3SWG.

VA3SWG
04-17-2010-VA3SWG

I know it’s just a handful of contacts but I’m really impressed so far. The ability to hit a button to tune the antenna and get on the air in a few seconds is pretty awesome. I can’t wait to try it out this summer and see what other contacts I can make. 73!