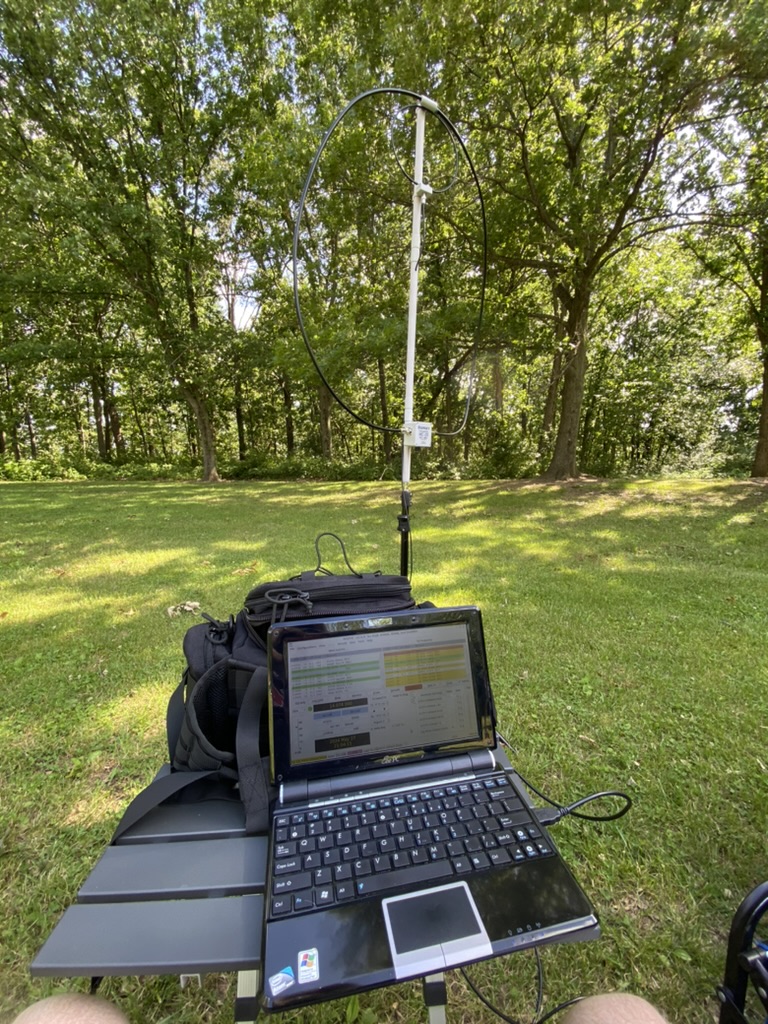
Connect to D-STAR reflectors using an Icom 705 and Raspberry Pi

Did you know you could connect to D-STAR reflectors on an Icom 705 using terminal mode through a Raspberry Pi? This tutorial will show you how to do it without needing a hot spot or MMDVM board.

Video

In addition to this written tutorial, I’ve also recorded a step-by-step video showing how to do all of this.

Gear needed

To get started, you will need the following hardware.
(Note: Some of these links are affiliate links (Amazon) that support my website and content creation at no additional cost to you.)

Pi-Star

The first thing we need to do is download and install the Pi-Star software on to the Raspberry Pi. Please understand that when you install Pi-Star it will wipe out everything on your microSD card. If you just want to experiment it might be a good idea to buy an extra microSD card so you don’t lose your existing data.

You can get the Pi-Star software from their website:

https://www.pistar.uk/downloads

As of the publication time of this post, the latest version is v4.2.1 so that is what you want to look for. Here is the direct link for that if you can’t find it.

https://www.pistar.uk/downloads/Pi-Star_RPi_V4.2.1_17-Feb-2024.zip

Once you have that downloaded you’ll need to extract the files from the zip file. On a Mac you can double click the zip file and it automatically extracts the files. If you’re using Windows, you can right click on the zip file and select Extract All and then Extract.

Etcher

Next we need to write the Pi-Star software to the microSD card. I use a free program called Etcher which is available for Mac, Windows and Linux systems.

https://etcher.balena.io/

Once you have that downloaded and installed, plug in your microSD card to your card reader. Open the Etcher software, choose Flash from file. Navigate to wherever you extracted the Pi-Star IMG file and select the file and click Open.

Next you click on Select target and pick the correct drive that has your microSD card in it. Usually it will say something like Generic MassStorageClass Media as well as showing you the size of the card. Make sure you choose the correct one and not any other drives on your system. Etcher is pretty good about telling you if it’s a system drive or a large drive which probably means that’s not the one you want to be installing Pi-Star on.

Once you have the target selected, click Flash to write the image to the card. If you’re on a Mac it may ask for a password as well as permission to access files on a removable volume. Go ahead and allow that to proceed.

Depending on the speed of your card and card reader, it may take a few minutes to write the image.

Once it has finished writing the image it should show Successful target with a green checkmark, If you are going to be using the Raspberry Pi on WiFi, then there’s an additional step we need to do before removing it from the card reader. If you will be using this plugged into a network cable, then you can skip this next step.

Back on the Pi-Star website, we need to visit the Wifi Builder section.

https://www.pistar.uk/wifi_builder.php

This creates a special file with your WiFi credentials that will tell the Pi how to connect to your WiFi router. Select your country code and then enter your WiFi name (SSID) and the password (PSK) and click submit. It will download a wpa_supplicant.conf file that you will drop onto the main folder of the Boot volume of the SD card. Once you’ve done that you can eject the microSD card from your card reader (Mac folks need to click the eject icon) and then insert it into the Raspberry Pi.

Plug in the power to the Raspberry Pi and wait about 2-3 minutes. If everything was successful, you should be able to connect to the following address in your web browser.

http://pi-star.local/admin/

If you got this far, it should take you to the configuration screen after a 10 second waiting period. It will then ask for a username and password which I have listed below.

username: pi-star
password: raspberry

Once you are on the configuration screen, the first thing to do is to change the Controller software to DStarRepeater and click Apply Changes. You’ll see a pop-up warning that says: “The modem selection has been updated, please re-select your modem from the list.” Click ok to dismiss the warning and we will deal with this shortly.

Next you will need to input your details. The main things you should focus on are callsign, system time zone and dashboard language. Once you have those items updates, click the Apply Changes button to save them.

In the D-Star configuration section, verify it has updated the RPT1 and RPT2 callsigns with your callsign that you entered in the previous step. I would also recommend changing the ircDDBgateway language to match whatever yours is. For me I chose English_(US). Click Apply Changes to save.

Next we need to select the radio modem. However, the Icom 705 doesn’t show up on this list by default. We need to manually add it to the list. Click the Expert option in the Pi-Star menu. Then click SSH access. This will bring up a pi-star prompt where you can login with the same credentials as you used before.

Once you are logged in you’ll notice towards the bottom that the disk is set to read-only by default. We need to switch it to read-write so we can add the 705 to the modem list. At the prompt, type in the following command.

sudo rpi-rw

You’ll notice that the prompt changes from pi-star@pi-star(ro) to pi-star@pi-star(rw) which shows it is now in read-write mode.

Next we need to edit a file to add the Icom 705 details to. Huge thanks to DH4FR-Frank for sharing his knowledge on how to do this.

At the prompt, type in the following command and press enter.

sudo nano /etc/udev/rules.d/100-pistar.rules

Delete everything in the file by pressing CTRL-K until everything is gone. Copy the text below and then right click on your terminal window in the Pi-Star window and select paste from browser. It will pop up a window and you will paste the text below into the window and hit ok.

#Added for IC-705
KERNEL=="ttyACM[12345]", SUBSYSTEM=="tty", ATTRS{idVendor}=="0c26", ATTRS{idProduct}=="0036", SYMLINK+="icom_ta"
KERNEL=="ttyACM[12345]", SUBSYSTEM=="tty", ATTRS{idVendor}=="0c26", ATTRS{idProduct}=="0036", ACTION=="add", RUN+="/bin/systemctl restart dstarrepeater"

Do a CTRL-X, then Y and then hit enter when it asks for a file name. This will save our changes to the file.

Back at the prompt, change it back to read only mode with the following command.

sudo rpi-ro

Now before we reboot the Pi to load our changes, I recommend plugging in your Icom 705 to the Raspberry Pi with the USB cable and turning on the 705. Once you’ve done that, type in the command below to reboot the Pi.

sudo reboot

Give it a minute and then try loading the website again.

http://pi-star.local/admin/

When you login, click the configuration tab at the top. In the Radio/Modem Type, click the dropdown box and select the following entry which should be at the top.

Icom Radio in Terminal Mode (DStarRepeater Only)

Click Apply Changes to save the settings.

Icom 705

On the Icom 705, we need to make sure the callsign is configured. Click the Menu button, Set and then My Station. Enter your callsign on the left side of the slash. There are 4 spaces available on the right side of the slash. I usually just put in my radio model like 705 on that side.

Next tap the Menu button, the #2 and then DV GW. Under Gateway Select, select External Gateway USB B. Then click Terminal Mode at the top of that menu to enable the mode.

In the TO field, tap the box to the right and then select Reflector, Link to Reflector and then Direct Input. For testing purposes, try REF001 E and tap Set. Now if you briefly key the microphone, it should connect to that reflector and you should hear a voice saying Linked to R E F, 0, 0, 1, E.

If you don’t hear anything, try unplugging the USB cable between the 705 and the Pi and plug it back in. Then disable and enable terminal mode as we did before. Then try keying the microphone again to see if it has linked to the reflector.

Once you are linked, try testing your audio to make sure everything is working. Choose Reflector, Echo Test and key the mic and say your call and testing and then a few seconds later it should come back with your voice. Pretty cool! This usually works on most reflectors as long as you connect to module E so if REF001 is busy or not working, try a different one.

Next try connecting to a different module than E and see if you can talk to someone. Tap the box to the right of the TO field, choose Reflector, Link to Reflector and pick something like REF001C or REF030C which are both fairly popular reflectors. Once that is linked, tap the box next to the TO box, choose Reflector and then Use Reflector. It should then show CQCQCQ in the box. Now key the mic and announce your callsign and ask if anyone is around for a chat.

When you are done using the reflector, tap the box next to the TO field, select Reflector, Unlink Reflector and then key the microphone and it will disconnect you from that reflector. You should hear a voice that says Not Linked.

You can also change reflectors from the Pi-Star dashboard. On the admin page, look for the D-Star Link Manager. Under Reflector, you can click the dropdown box and either scroll through till you find the reflector you want or use the text entry option to type in your reflector number. Don’t forget to click the dropdown next to it and change the module to the appropriate one. Then click Request Change to connect to the reflector. Using this method may be useful when there’s a net or a lot of traffic on the reflector and you can’t get your radio to unlink.

You’re probably wondering at this point how you find which reflectors are active. There’s a couple of options.

D-STAR last heard
This shows the latest people connected to various reflectors or repeaters and which ones they’ve connected to. If you see the same ones listed close together it might be an indication that the reflector is active.

N5VLZ’s net spreadsheets
Darryl-N5VLZ has fairly updated spreadsheets in various time zones of D-STAR and Echolink nets. They are much more accurate than the ones you find on the D-STAR Info website.

If you’ve made it this far, let me know if you succeeded in getting everything to work. If you have any questions, please leave a comment on this blog and I’ll do my best to help answer them. Thanks!

Memorial day POTA activation at Clinton Lake (US-4093)

S9 pulsing noise from a nearby electric box.

On Memorial Day (May 27, 2024), my wife and I visited Clinton Lake State Recreation Area (US-4093) for the afternoon. The lake and parking lots were packed with boaters and campers. We tried to find a spot with a view of the lake, but ended up settling on the exact spot we went to last September. The weather was 75 degrees with a nice breeze to keep most of the bugs away. Despite being close to the two emerging broods of cicadas, we didn’t see any on our visit.

I setup my Icom 705 and the OM0ET MC-20 magnetic loop which is my go-to setup. While I do pack a 12v external LiFePO4 battery, I decided to just use the Icom 705 battery pack and run 5 watts. Instead of dealing with the previous problems with the iPad and connecting it to the 705, I brought a laptop with me. This is an old Asus EEE PC I bought in 2009! I recently revived it and I’m still astonished the battery holds a decent charge. It’s slow and only has 2 GB of RAM, but I was able to install a 32-bit version of Linux (Lubuntu 18.04) on it. It runs WSJT-X v2.40 and interfaces via USB cable with the Icom 705. The 10” screen is just big enough for WSJT-X though some of the settings are not visible in the menu.

Despite having a laptop, I still had some issues. One was it did not connect to my phone because I’m guessing the wireless card doesn’t like my iPhone for some reason. Even with the maximize compatibility option enabled, it would not connect. The second issue was the same as the last visit to this park and that was a pulsing noise coming from an electrical box down the way from where we were setup. Rotating the mag loop didn’t remove the noise.

At first I thought the noise was preventing me from decoding any FT8, but I quickly realized that the time on the computer was off 3-4 seconds. Without the internet, I didn’t have an automated way to update the time. While the 705 has a GPS built-in, I didn’t have it configured yet on the computer. So I just pulled up the time on my phone and set it manually. As soon as I did that, the decoding started working. Whew!

I hopped on the POTA website and spotted myself on 20m FT8. I started calling CQ and not too much later I received some replies. I checked PSK Reporter and my signal was being heard around the US. I tried switching to 15m but never made any contacts so I went back to 20m and made a few more before shutting down. I finished with 17 contacts in about an hour and a half. Not bad for 5 watts and a mag loop antenna!

It was nice not having any connection issues with the laptop and 705 using the USB cable. It was also nice to be able to call CQ POTA which I think helped people find me. I enjoyed putting the old laptop back into service. It still had around 50% battery left after an hour and a half which is amazing for the age of the battery. I think once I get the GPS from the 705 interfaced with the laptop that will eliminate the need to set the time manually. I may also try tethering my phone to the laptop via USB and see if I can get internet that way. It’s not completely needed but would be nice to have.

Log

DateTime (UTC)CallsignBandModeNotes
5/27/202420:53KA3E20MFT8
5/27/202420:56KB3IAI20MFT8
5/27/202421:00K7ZYV20MFT8
5/27/202421:08AG5PC20MFT8
5/27/202421:18N3ADO20MFT8
5/27/202421:21KI4MNR20MFT8
5/27/202421:28K2WLD20MFT8
5/27/202421:33NY4FD20MFT8
5/27/202421:39K4RNY20MFT8
5/27/202421:41KG2CV20MFT8
5/27/202421:45VE3UZX20MFT8
5/27/202421:47KF0PXO20MFT8
5/27/202422:08KC3ASJ20MFT8
5/27/202422:21WA2WL20MFT8
5/27/202422:25KD2MDS20MFT8
5/27/202422:27W2JC20MFT8
5/27/202422:29KC2HFQ20MFT8

Gear

Here is the list of gear I used for this outing. Some of these links are affiliate links that support my website and content creation at no additional cost to you.

  • Icom IC-705 QRP HF/VHF/UHF portable radio: DXE | GigaParts | HRO | MTC | R&L
  • OM0ET MC-20 Magnetic Loop Antenna: OM0ET Website
  • Insignia 6-ft light stand (NS-DLS75SBK): Amazon
  • JJC Deluxe Lens Case Pouch for Icom 705 (XXL size): Amazon
  • SHANGRI-LA Tactical Range Bag: Amazon
  • GCI 20 Outdoor folding table: Amazon

Failed POTA activation at Wolf Creek State Park (US-1033)

It has been over six months since I’ve attempted a POTA activation. The weather has started warming up a bit and I was well overdue to try another POTA activation. On April 6, 2024, the wife and I visited Wolf Creek State Park (US-1033) near Shelbyville, IL. On our way to the park, we stopped for lunch at the Broomtown Cafe in Arcola, IL. Sadly we arrived too late for breakfast so we tried the grilled cheese sandwich. I got mine with bacon which was pretty good.

We continued on our journey and arrived at the park around 3pm. I drove around looking for a decent spot to setup and eventually parked near the area marked overlook. There was no one there when we got there, so we setup amongst the trees with a nice view of the lake. It was in the 50s and sunny, but a darn wind off the lake was keeping us chilled. I had a sweater on but didn’t want to go back to the car to get my coat. The wife was smart and had a nice blanket to keep her fairly warm.

I setup the OM0ET MC-20 magnetic loop antenna and connected it to the Icom 705. My first thought was to try to work some FT8 to hopefully get the park activated. Well that went nowhere fast. I used my iPhone’s hotspot to create a mini network between the 705 and my iPad. The 705 connected just fine but my iPad was having nothing to do with my phone.

I then decided to try the access point mode on the 705 and connect the iPad directly to it. That worked for a few seconds and then either the iPad or the SDR Control software disconnected leaving me out of luck on the digital modes. I’ve never had much luck connecting directly and this time was no different. I don’t know why I didn’t bring my laptop but I digress.

My next idea was to find a spot on 10 meter SSB and call CQ. I found an empty frequency on 28.475 and started calling CQ POTA. I spotted myself on the POTA website but never heard anyone come back to me. No worries, there were several QSO parties going on the bands so I tried my hand at those. I managed to work two folks in the Mississippi QSO party and one in the Louisiana QSO party on 20m. I switched to 17m and worked CT9/UR9IDX in Portugal which was pretty cool. I was only running 5 watts off the Icom 705 battery pack.

Sadly it was getting closer to sunset and the cool wind was a bit too much discomfort for us so I had to cut the activation short before getting my ten contacts. I packed up the ham gear along with our tables and chairs and headed back to the car. We then made our way back to Champaign as darkness fell.

After I thought about the connection issues more, I remembered we had switched cell phone providers since the last POTA activation. I discovered the new carrier only allows one device to be connected to the hotspot at a time. That explains why I was unable to connect both the iPad and the 705 to my phone. I probably should get a portable router that both devices can connect to when I’m out and about. Or just bring a laptop and connect via USB which would probably be the easier and cheapest option. Despite the chilly weather and failed activation, it was nice to get spend a few hours playing radio outside.

Log

DateTime (UTC)CallsignBandModeNotesAudio
2024-04-0621:30K5M20MSSBLouisiana QSO Party
2024-04-0621:32W5SGL20MSSBMississippi QSO Party
2024-04-0622:12CT9/UR9IDX17MSSBMadeira Island
2024-04-0622:21W5NO20MSSBMississippi QSO Party

Gear

Here is the list of gear I used for this outing. Some of these links are affiliate links that support my website and content creation.

  • Icom IC-705 QRP HF/VHF/UHF portable radio: DXE | GigaParts | HRO | MTC | R&L
  • OM0ET MC-20 Magnetic Loop Antenna: OM0ET Website
  • Insignia 6-ft light stand (NS-DLS75SBK): Amazon
  • JJC Deluxe Lens Case Pouch for Icom 705 (XXL size): Amazon
  • SHANGRI-LA Tactical Range Bag: Amazon
  • GCI 20 Outdoor folding table: Amazon

My first POTA activation at Clinton Lake (US-4093)

Clinton Lake State Recreation Area (K-4093)

Labor day weekend 2023 was upon us and it was a good time as ever to test out my new setup. That consisted of the Icom IC-705 and OM0ET MC-20 magnetic loop antenna. My wife wanted to go to a park so I suggested we go to a state park so I could potentially get my first POTA activation. She decided on Clinton Lake State Recreation Area better known as US-4093 in the POTA world. It is about 30 miles straight west of Champaign so it was an easy park to get to.

We headed out around 10:30am on Sunday (9/3/2023) to the park. It was forecasted to be sunny and close to 90 degrees so shade would be crucial to staying comfortable. This park is pretty active for boating and swimming and it was definitely busy for the last weekend of the summer.

Our home under the shade trees for the day.

We managed to find an area just a bit away from the lake that had a nice grassy area with some trees. The clip-on umbrellas we bought the day before were too small for our chairs so thankfully we had the trees to provide us with good shade. There was also a nice breeze that kept most of the bugs away except for the curious ants and sweat bees.

Once our chairs and table were setup, I started working on setting up the magnetic loop antenna. It takes less than 5 minutes to get it assembled. I plugged the coax into the Icom 705 and tuned the antenna for maximum noise. I then fine tuned it for the lowest SWR which was usually just under 1.5. The 705 makes it really easy with the built-in SWR meter.

I also hooked up the Bioenno 12v 4.5Ah battery to the 705 via the West Mountain RigRunner 4004 USB distribution block. I am using a 4 amp fuse in the block for the 705 since I’m not using the Icom cable that has built-in fuses. This setup would give me more than enough battery for the time I would be at the park. It does allow you to bump up the radio to 10 watts using the external battery but I chose to stay at 5 watts and make the battery last even longer.

OM0ET MC-20 magnetic loop antenna

One of the nice features of the 705 is the remote capability via Bluetooth and WiFi. The most reliable option I have found so far for WiFi in the field is to connect the 705 and iPad to my iPhone hotspot. I use the SDR Control iPad app to work FT8. When it works it’s nice but there are some quirks I will discuss later.

Icom IC-705 hiding in the bag next to an iPad and a much needed fan.

I wanted to spot myself via APRS as a proof of concept, but I didn’t realize the GPS was set to manual position on my HT. The beacons that did make it out were showing up as coming from my home position. Oops! Thankfully I had cell service so I got on the POTA website and let the world know where I was and what mode I was on.

My little FT8 signal spotted on the RBN!

I got on 20m FT8 around 12:30pm and started calling CQ. It was tough going as there were so many signals on the band. Using the iPad app, I had to manually input the transmit frequency as I couldn’t tap or adjust the frequency visually. I also could not figure out how to adjust my messages to say CQ POTA which probably would have helped a little bit. There were a few stations that it wouldn’t even let me contact due to their callsign (some DX) so I was getting a bit frustrated.

I moved around the waterfall a bit and finally made a few contacts. That gave me some hope that I might pull this off. I tired of 20m and tried a few other bands. Oddly, most of the stations I was hearing on 15m and 10m were DX! Sadly, I couldn’t get any of them in the log. I was able to make one contact on 17m but the others were all on 20m.

I attempted some voice operations but every time I tried talking with the microphone or the headset, no audio came out. First I made sure I was in the right mode. Then I checked the “MOD INPUT” setting in the radio and that looked good but still audio. I gave up and went back to FT8 as I wanted to get enough contacts to activate the park. Once I got home I discovered my mic gain was set to 0 percent. It’s always the little things!

I made my last contact at 3:25pm and decided to shut it down for the day. I had a couple of dupes so my total unique QSOs was 13. That is enough for a successful activation! Not bad for 5 watts and a mag loop antenna.

After packing up everything, we walked down a path towards the lake. This was our first exposure to the sun and it was a lot hotter than our nice shady area. There were lots of boats in the water and still more coming in. Definitely would have been a great day to be on the water. We saw a groundhog on the way back to the car. I think he saw his shadow so does that mean 6 more weeks of summer? 🙂

We cooled off in the air conditioned car for a bit and then headed out of the park. We drove west a few miles into Clinton, IL and had a nice dinner at Snappers Bar and Grill. On the way back to Champaign, we stopped by Weldon Springs State Park (K-1030) to walk around and take a few pictures. We even saw a deer run into the forest as we were walking back to the car. It was getting late so I didn’t have time to attempt a POTA activation on this visit. Hopefully in the fall we can visit again and activate the park.

I am very glad I was able to activate the park especially on my first attempt. Despite the achievement, I had numerous issues especially with the SDR Control app for the iPad. Some of it may be my inexperience with the app so I will need to do more research on it. I think I might take the laptop and USB cable for my next activation.

Curious groundhog hanging out by the lake.

Gear

Here is the list of gear I used for this outing. Some of these links are affiliate links that support my website and content creation.