Champaign IL ham radio repeater stream

scannerstream1
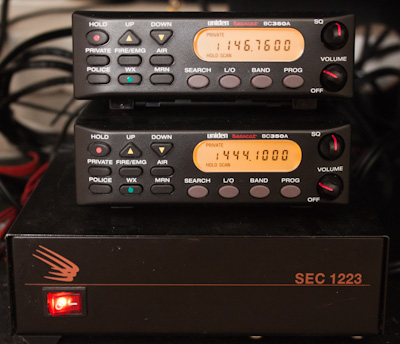
I recently got a wild hair to stream some ham radio audio. I’m already familiar with the streaming process as I stream the Champaign, Illinois NOAA weather radio on Wunderground. My plan was to run a stereo feed with the left channel going to one repeater and the right channel going to the other repeater.

I found a decent deal on some Bearcat BC350A’s on eBay, so I purchased 2 of them. I debated on adding a second sound card to the computer streaming the weather radio, but decided it’d be easier to just use a second computer. Luckily I had an old Dell Optiplex GX260 here that would be suitable for streaming. I have the scanners hooked up to my old Samlex 1223 power supply. I had mixed feelings if this would even work as it had some issues with the HF rig, but so far it’s been running great. The antenna setup is tricky since I am unable to put up anything outside.

The scanners came with a simple window mount antenna with suction cups, but the gear was too far from any windows. When I first tested the audio, the signals would fade in and out and they were picking up interference from surrounding electronics. I did some research on splitting antenna signals and decided to go the cheap route. I found some RG6 quad shielded coax and used that to stretch across the room to the window. I have that hooked up to a 4-way cable TV splitter. I have several adapters converting from F to BNC. Some folks say that will cause a lot of signal loss, but in my situation it shouldn’t matter too much. I live within a mile of the tower that the repeaters are located on, so the using suction cup antenna in the window should suffice.

I decided to use Radio Reference to stream my feed. They mainly focus on public safety feeds, but they also allow ham repeaters on their network. Basically I send my stream to their servers and they stream it to whoever wants it. They can support tons of traffic vs me trying to run the feed from my home DSL line. I was hoping to get my feed approved ASAP as we were expecting some severe weather during the week.

I was approved on May 23rd and went live in the morning on May 24th. On May 25th, we were expecting some nasty weather. One of the repeaters on my stream is the local ARES repeater which runs weather nets as needed. Sure enough, we were under a tornado watch and even had a tornado spotted outside of Champaign. I checked the stats afterwards and discovered I had 35 visitors during that time. That made me feel like my efforts to get the stream going were put to good use.

As mentioned earlier, the stream consists of 2 repeaters split across the left and right channels. That is, you’ll hear one repeater on the left speaker and the other on the right speaker. The repeater on the left is the K9CU repeater on 146.760 Mhz. This repeater is connected to Echolink and is a general purpose repeater. It has a weekly Thursday night net open to all ham operators. (9pm local time) The repeater on the right is the K9SI repeater on 444.100 Mhz. This repeater is the Champaign County ARES repeater which runs the weather nets. They also have a weekly Tuesday night net for both ARES members as well as any other hams who wish to check in. (9pm local time)

There are several Android and iPhone apps that interface with the Radio Reference streams. There is one app for iPhone called 5-0 Radio that has my stream available. If you want more details on the stream, here is the link to my feed page at Radio Reference:

K9CU 146.760 Mhz and K9SI 444.100 Mhz Amateur Repeaters

If you have any questions about the stream that I didn’t cover, please post them in the comments section. Thanks!

Yaesu VX-8R audio fix

I’ve had my Yaesu VX-8R HT for about a year and a half now. It’s been a nice little radio except for an annoying issue with the audio. When pushing buttons, the audio sounded weaker and scratchy. I noticed that pushing down on the speaker improved the quality. I’ve lived with it for all this time and finally had enough.

I started browsing various internet forums and ran across a solution that seemed to fix the problem. It appeared to be a simple fix which required no soldering and very little tools.

The author of the article posted a nice video on YouTube showing the steps he performed to fix the same problem on his HT. The basic solution was to slightly bend the speaker contacts on the main board of the radio so they would make a better connection with the speaker on the front of the case.

I figured I’d give this a shot. I dug out my small tip screwdrivers and followed his steps to open up the radio. I adjusted the contacts and put the radio back together. I felt energized until I turned the radio on and it said ‘Clone’. At this point I was thinking I had damaged something on the board. I took a deep breath and dug back into the radio again. I bent the contacts down a bit just to make sure they weren’t touching something else on the radio.

I put it back together and turned the radio back on. It came up normally this time. I pushed a ton of buttons and the audio was perfect, no scratchy audio this time. Yay!

I did take a few pictures while I had the radio apart just for kicks.

Total credit goes to the unknown author’s detailed description and YouTube videos from the forum below.

Source: Worldwide DX Amateur Radio Forums (unknown author)

Have you experienced this issue? Did the solution described above fix your problem? Let me know in the comments section.

Yaesu FT-857D Mobile Installation

Over the years I have tried to find a solution to get a decent HF solution into my car. I started with a Radio Shack HTX-10 10 meter rig, but the sunspots and mag mount antenna did not yield much of anything. I also had an Icom 706 hooked up to a ham stick / tuner, but that didn’t work very well either. Since moving a few years ago, I have been unable to install anything at home due to antenna restrictions so HF operation has been impossible. I even tried a Yaesu FT-817 QRP rig indoors with various antennas, but there was just too much noise to hear anything. Was I completely out of luck for HF?

A few weeks ago I decided to sell my FT-817 and accessories to help fund a new radio/antenna. I ended up choosing the Yaesu FT-857D and the ATAS-120A mobile antenna. Now I know there are limitations to this antenna as well as it being a little more expensive than a hamstick, but I had to give it a shot. Everything in the past has been a painful time consuming process just to get on one band, let alone trying to switch between bands quickly. I wanted something that would be as easy as turning on the radio and getting on the air. Would this setup disappoint me as well?

Diamond K400C trunk mount

I chose the recommended Diamond K400C trunk mount which doesn’t require any drilling. I wasn’t sure how well this mount would work as all my other mounts have been magnet mounts. Obviously with this antenna being a little heavier and taller than most dual band antennas, a regular mag mount wouldn’t work. I installed it on the drivers side of the trunk and ran the cable in through the backseat with all my other cables. As for the radio, I mounted on the floor board behind the passenger seat with my other radio. I use the word mounted loosely as it’s really just velcroed but it’s not going anywhere.

The radio came with the separation kit, so that saved me some money. I currently have the faceplate mounted on a vent mount above my XM radio on the dash. I’m really not impressed with this type of mount as it moves around too much, so I will look for a different solution. The microphone and speaker are loosely mounted so I can hide them away when I’m done using them. The power cord is run directly to the battery through the firewall.

Yaesu ATAS-120A
Yaesu ATAS-120A

When I first turned the radio on, I was a little overwhelmed by all the menu settings. However, after thumbing through the manual I became a little more familiar with them. I found the setting to enable the ATAS-120A antenna and hit the tune button. The first time you run it, it takes a few minutes to initialize but after that it’s pretty quick. I flipped through all the bands and it was able to establish a 2:1 or less SWR every time even on the WARC bands. (according to the built-in SWR meter anyways) I tuned around the bands and was hearing numerous signals, so that was another promising discovery.

I decided to visit a local park about 8 miles NW of town which would hopefully get me away from most of the noise of the city. The Michigan QSO party was going strong and I thought I’d try responding to one of them just for kicks. NV8N was coming in pretty strong on 40m so I threw out my call running 50 watts. He heard me on the first try which threw me off guard as I had no idea what the exchange for the contest was. 🙂 Luckily he was patient and explained what info he needed from me and like that my first contact had been made! Not too shabby I thought.

I continued scanning around the bands and landed on 17m. I heard ON4HIL calling CQ, so I tried calling him. It took numerous tries as others were calling and the band was up and down, but I eventually got him. He gave me a 5×2 report and said that wasn’t too bad for my 50 watts. After the brief QSO, I looked up the prefix on my phone and discovered he was in Belgium! I know for most hams with big stations at home this would be boring, but for me to work another country in the mobile with 50 watts is pretty darn cool to me. I was actually quick enough to record the QSO on my phone just so I had proof of the contact.

ON4HIL
04-17-2010-ON4HIL

Later that evening, I went for a drive and tuned around on 40m. I noticed that the Ontario QSO party was also going on. I managed to work several stations while I was driving, so that was pretty cool despite the increased noise from the car. I managed to snag a recording of the QSO with VA3SWG.

VA3SWG
04-17-2010-VA3SWG

I know it’s just a handful of contacts but I’m really impressed so far. The ability to hit a button to tune the antenna and get on the air in a few seconds is pretty awesome. I can’t wait to try it out this summer and see what other contacts I can make. 73!

Yaesu VX-8R on the bicycle

IMG_0531After yesterday’s 6 mile walk, I figured I’d dust off the bike and take it for a spin this morning along the same route. It’s due for a check-up this week so I wanted to make note of any issues or strange noises to share with the local bike shop. One of the great things about the bike is the storage bag on the bike where I can stash a few goodies. I brought along my Canon A590 point and shoot camera so I could take a few pictures. (wished I’d had it on my walk yesterday morning) No bike ride for Stan is complete without a GPS and ham radio and today’s ride was no exception. Last month I bought a new handheld radio (Yaesu VX-8R) and bike mount so I was anxious to try that out as well.

I departed my apartment at 6:21am and headed through the path at Kaufman Lake. I quickly got a chance to see how my bike would handle on gravel and bumpy terrain. (suspension might need a little adjusting?) 🙂 I made my way towards Parkland College and stopped near one of the softball fields to grab some water from the fountain. Even this early into the ride my legs were showing me just how out of shape they are so I took it easy for a bit. As I approached the main entrance of Parkland, I noticed dozens of geese roaming around which definitely warranted a photo shoot. 🙂 I pulled over and snapped several pictures and the geese really didn’t seem spooked by me at all. IMG_0530

I continued my way to the northeast and found a few flowers that wanted their picture taken. Despite the sun not yet making its way to this part of the complex, the pictures didn’t turn out too bad. After that I headed over to the tennis courts to take a few shots. Then I found a soccer field that called my name, so had to get a few shots of the nets which were pretty cool. As I walked back to my bike, I heard what I thought was a lawnmower in the distance. Suddenly I saw this flying contraption coming towards me which definitely required some picture taking. I’m not sure what it was, but it was a one-person machine with what looked like a giant fan behind him and a wing above him. He flew on by so I went on my merry way.

IMG_0529I made my way around Parkland and headed back towards home. I stopped at Heritage Park and took a few pictures of the lake and tried (failed) some macro shots of a bug. I continued on the path home and took a detour to avoid spooking a rather large dog being walked by their owner. 🙂 I made another stop on Country Fair drive to take a few more flower pictures and then headed home.

Final Thoughts
Yeah, I know I really didn’t ride very far compared to what normal people do but it was fun. I just need to ride more often to get my legs conditioned. It was very comfortable out this morning and the breeze was welcomed. I need to figure out why my ham radio did not transmit my location to the internet, not sure what happened there. Some other lessons learned this morning:

  • My legs are really out of shape
  • My ham radio was unsuccessful at getting my location transmitted.
  • You burn more calories riding a bike than walking the same path.
  • Always have spare batteries for your camera (which I luckily had!)

Stats
Total Mileage: 5.79 miles
Total Time: 69 minutes

Photos
Click here to view all photos from this trip.

Upgrading the bicycle with ham radio

Well due to inclement weather and faulty pedals, I haven’t been on the bike in a little while now. I took the bike into the shop on Wednesday and had them install fenders as well as replace the pedals. Now the funny part of this is that the guy who worked on my bike is a customer where I work. Due to computer problems, he was behind on his payment so I had shut his service off on Tuesday! So he recognized me when I brought the bike in and I thought ‘oh boy, my bike will be CRW_1514destroyed now!) 😉

I dropped it off on a shortened lunch hour and went back to work. After work, I went over and picked the bike up. The fenders look amazing, they’re black instead of the boring silver ones you see on most bikes. The pedals are all metal instead of those crappy ones with rubber grips that came with the bike. The only thing they charged me for was the fenders, installation and swapping of the pedals was free! The fun part was actually paying. I have this nifty Trek credit card I’m using so that I can ride my bike before it gets too cold, yet pay for it a little later down the road. Well apparently this is something new for the bike shop as it took probably 10 minutes to checkout. (I guess most folks pay with cash, check, or regular credit card??) Anywho, the guy who worked on my bike is in need of computer help so I may be working on his computer in my free time. So that will work out great! 🙂

The hard part was getting the bike in the car as I didn’t anticipate the fenders being on there. I had to be careful not to bend/break them when putting the bike back in the car. I managed to do ok, though I had to do a small adjustment on the front fender as it was rubbing against the tire. After I got that done, it was time to install the goodies that I’ve drooled over. 🙂 I purchased a nifty CRW_1517 Garmin GPS 60csx unit that will ensure that I don’t get lost and let me map out a route should I need to deviate from my normal trip to work. It came with a 64 meg card which was perfect for not only the entire county but the entire state of Illinois including Chicago!

I had considered using my PDA and my bluetooth GPS unit on the bike, but the battery life of the PDA is horrible compared to a standalone unit. I also purchased a dual band ham radio HT (Kenwood TH-D7A) for the bike because lets face it, Stan without some sort of radio on CRW_1515his vehicle is just boring! As with my car, this will allow me to utilize the APRS network and plot my position on the internet! (once I get the cable to hook up the radio to the GPS!) I will post more on this aspect later. I have ordered a better HT antenna for the radio to hopefully be enough to hit the digipeater, but eventually I will probably need to come up with a real external antenna mounted on the back of the bike. (people will think I’m a cop or security guard!)

So this morning I rode to work for the first time in several weeks and it was tough on the old body to get back into the groove. One of the main reasons of getting the GPS was to track not only my location, but to map the elevation between my house and work. There’s a great website called MotionBased that allows you to export your data from the GPS into their site and then they map out all sorts of graphs and data from your GPS log. I’m anxious to try this out and see just how much of an elevation rise/drop on the route I take. I will update this at a later date as well.