Ham radio | Raspberry Pi | SDR | other tech stuff
Track weather balloons with a Raspberry Pi and RTL-SDR
I’ve always been fascinated with weather balloons and how important they are to weather forecasts. When I discovered there was software available to track them, I had to give it a try. Sites like Sondehub and Radiosondy are great but they only work if people are feeding data to them. At the time, there wasn’t anyone in my immediate area providing tracking data. My antenna is indoors but it is tuned to the 400-406 MHz frequency range so it works a lot better than a ham radio antenna.
After getting it to work, I decided to write a tutorial so others could enjoy tracking the balloons.
Gear
To get started, you will need the following hardware to get started.
(Note: Some of these links are affiliate links (Amazon) that support my website and content creation at no additional cost to you.)
- Raspberry Pi 4 Kit or Raspberry Pi 5 Kit (the kits includes the microSD card, USB card reader, case and power supply.)
Note: If you have a Micro Center nearby, you can build out the Pi individually a bit cheaper than buying a kit. - RTL-SDR v3 dongle
- N9TAX-Custom Slim Jim antenna (403 MHz)
Note: Make sure you click the custom tune button and enter 403 MHz which will cover the whole frequency range of the balloons. - USB microSD card reader
I will be using this Pi in a headless environment. Basically that means that once I have it setup, it will not be connected to a keyboard or monitor. For the software, I’m going to be using the Raspberry Pi OS Lite 64-bit version. I find that it uses less resources on the Pi than using the full desktop operating system. The easiest way to install it is to use the Raspberry Pi Imager software. It is available for Windows, Mac and Linux.
Raspberry Pi Imager: https://www.raspberrypi.com/software/
I have another tutorial that shows how to install the Raspberry Pi OS Lite operating system if you’ve never done it before.
Raspberry Pi OS Lite 64-bit installation tutorial
Once you have the operating system installed, you can access it either via plugging it in to a keyboard and monitor or preferably remote into via SSH like I do in the video above. That will require you to know what the hostname or IP address of your Pi is. If you don’t want to mess with that, then just use a keyboard and monitor.
On a Windows machine, you can use a client like PuTTY. On Mac/Linux, you can use the built-in terminal app.
Note: Throughout this tutorial you will see commands in white with a black background. If you’re using SSH, you can just copy and paste these commands into the window and it will make things go a lot faster than typing everything in manually. Also, when you use the sudo command it will prompt you for your password.
Next you will need to visit the Radiosonde_auto_rx Github wiki page for the software and instructions. I will be using them as a guide as we go along in the process.
https://github.com/projecthorus/radiosonde_auto_rx/wiki
Before we begin, we need to update the Raspberry Pi operating system.
sudo apt update && sudo apt upgrade -yThen we need to install some required tools before we install the actual software.
sudo apt install -y python3 python3-venv sox git build-essential libtool cmake usbutils libusb-1.0-0-dev rng-tools libsamplerate-dev libatlas3-base libgfortran5 libopenblas-devFor better compatibility with various RTL-SDR dongles, we’re going to get the latest version of the RTL-SDR software and compile it. It might sound complicated, but just follow the commands below.
git clone https://github.com/steve-m/librtlsdr.git
cd librtlsdr
mkdir build
cd build
cmake -DINSTALL_UDEV_RULES=ON -DDETACH_KERNEL_DRIVER=ON ../
sudo make install
sudo ldconfig
Next we need to create a blacklist file.
sudo nano /etc/modprobe.d/rtlsdr-blacklist.confOnce you’ve got that opened, you’ll need to copy and paste the following lines into the file.
blacklist dvb_usb_rtl28xxu
blacklist rtl2832
blacklist rtl2830
blacklist dvb_usb_rtl2832u
blacklist dvb_usb_v2
blacklist dvb_core
Save the file by doing a CTRL-X and then Y and hit Enter to confirm. Then we will reboot the Raspberry Pi.
sudo rebootOnce the Pi comes back up, log back into it and run this command to see if it properly recognizes the RTL-SDR.
rtl_testYou should see that it found 1 device and gives you a bunch of info on the RTL-SDR. Hit CTRL-C to get out of the test.
Next it’s time to install the Radiosonde_auto_rx software.
git clone https://github.com/projecthorus/radiosonde_auto_rx.git
cd radiosonde_auto_rx/auto_rx
./build.sh
cp station.cfg.example station.cfg
Now that the software is installed, we need to edit the config file.
nano station.cfgThere is a lot in this file but you don’t have to change everything. The first thing you want to change is the frequency range. Here in the US, they use 400.05 – 406 MHz. Other locations are slightly different.
min_freq = 400.05
max_freq = 406.0
The next thing in the file you want to look at is only_scan, never_scan and always_scan.
only_scan = []
never_scan = []
always_scan = []
If you know that your local weather office always uses the same frequency on their balloons, you can add that into the always_scan so it will always look for that balloon. If you only want to scan for one frequency, you could put that in the only_scan area. For me, I want to track any balloon that is within range.
Sometimes you will see random spikes in your scans. If you hover over those, it will give you the frequency. You can then add them into the never_scan area so the software doesn’t get bogged down and delay finding a real balloon.
All this to say that you can leave them all blank for now and modify them once you get more familiar with the balloons in your area.
Next up is your station location.
station_lat = 0.0
station_lon = 0.0
station_alt = 0.0
If you don’t know your lat, long and altitude, you can go to a site like https://www.mapcoordinates.net to get the data. The altitude in the software is expecting meters so use that value.
If you plan on uploading your data with Sondehub.org and Radiosondy.info, there’s a few settings that you need to update. The first is the uploader_callsign. If you’re a ham, I recommend putting your ham callsign in here. If you’re not a ham, use your name or a nickname.
uploader_callsign = CHANGEMEA few other things to change.
upload_listener_position = True
uploader_antenna = Type of antenna you are using
sondehub_enabled = True
sondehub_upload_rate = 30
sondehub_contact_email = youremailaddress
You can also upload to Radiosondy.info if you are a ham. Here’s the fields you need to change for that. The passcode can be generated using your callsign from https://apps.magicbug.co.uk/passcode/.
aprs_enabled = True
aprs_user = Ham callsign
aprs_pass = 5 digit passcode
station_beacon_enabled = True
One cool feature is to get emails when your station detects a balloon launch or nearby landing. You’ll need a compatible email provider that offers SMTP server access. If you have that, here’s some settings to change.
email_enabled = True
launch_notifications = True
landing_notifications = True
landing_range_threshold = 30 (this is in KM so adjust accordingly)
smtp_server = whatever your SMTP server is
smtp_port = ask your email provider
smtp_authentication = ask your email provider
smtp_login =
smtp_password =
from = your email address
to = your email address
You can browse the rest of the file but at this point we can save and close out of the settings by doing a CTRL-X and then Y to confirm.
Next we need to install some additional packages to run the tracking software.
cd ~/radiosonde_auto_rx/auto_rx/
python3 -m venv venv
source venv/bin/activate
pip install -r requirements.txt
You might see a few warnings but everything should install successfully. Next we need to run these commands. Make sure you see (venv) in front of your prompt or these commands probably will fail.
cd ~/radiosonde_auto_rx/auto_rx/
source venv/bin/activate
To test out if we have everything configured correctly, run the following command.
python3 auto_rx.pyYou should see a log file on the screen. To further test, open up the web interface. This will depend what the name or IP address of your Pi is. Whatever name or IP address you used to connect to the Pi in the beginning of this process is what you can use here. If you didn’t change the hostname, try this to get to the web interface.
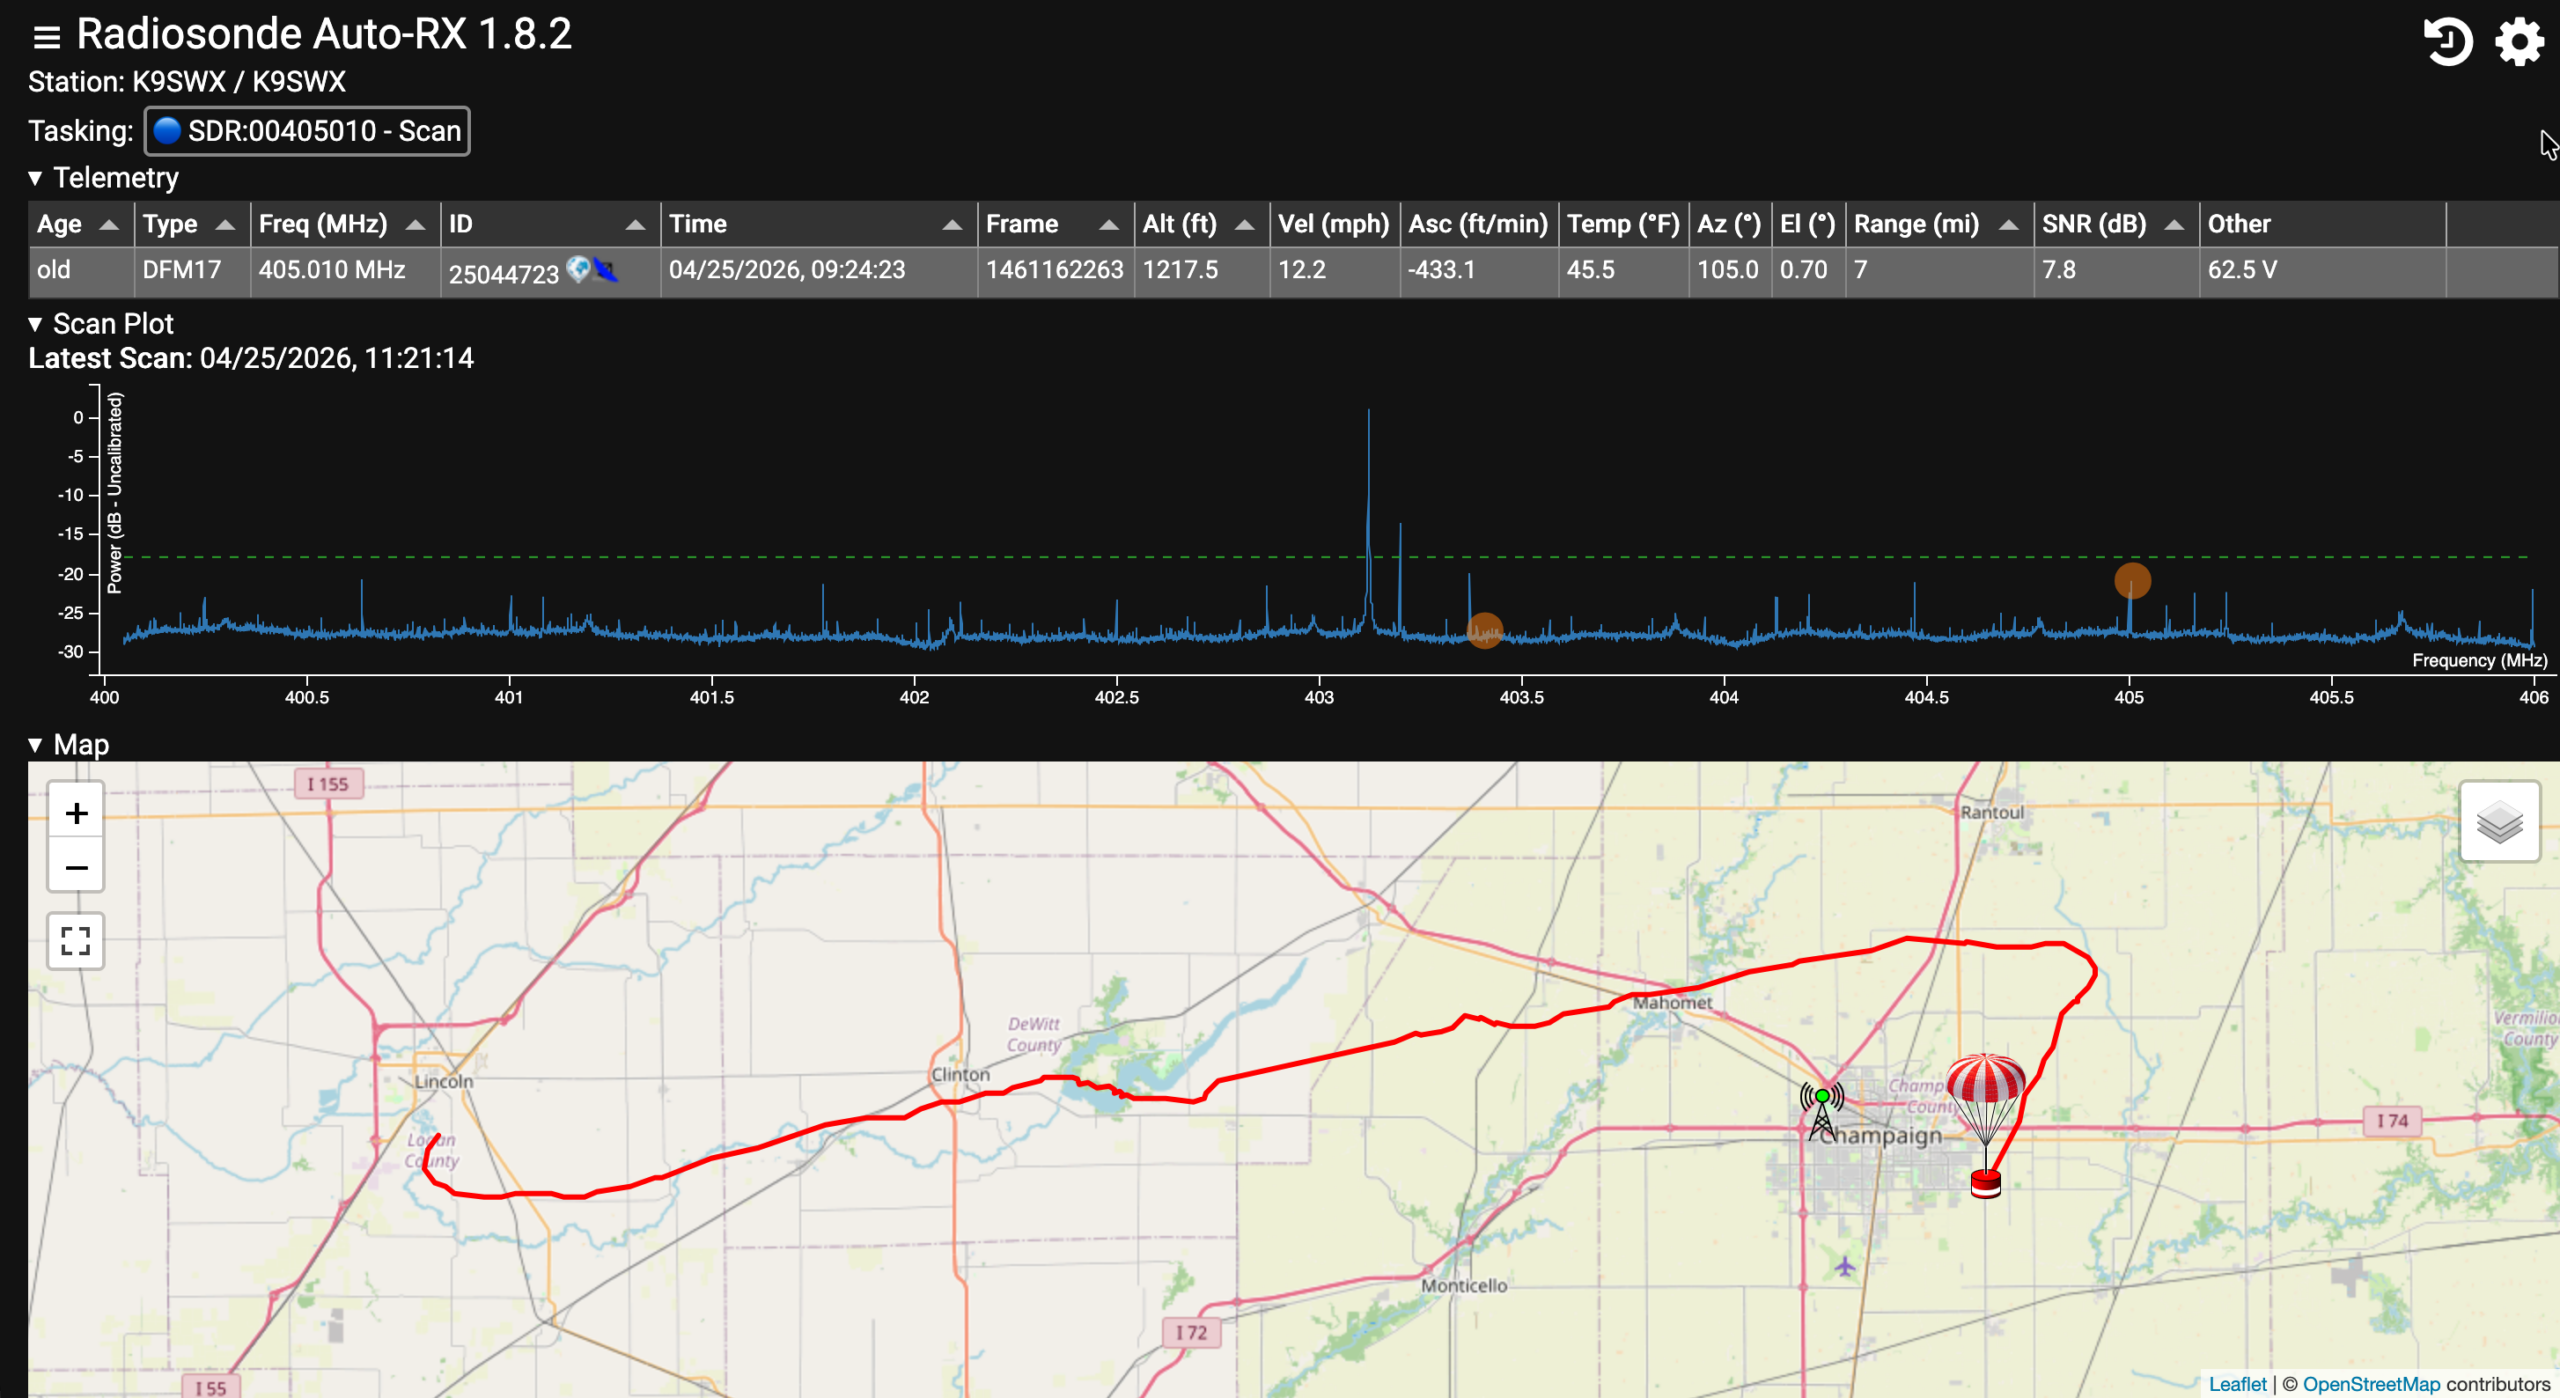
If that works you should see a screen with a map on it with your location and a table at the top with any balloons it might be picking up. You should also see the scan plot that shows the full 400-406 MHz range with any signals or noise that you are receiving.
If everything looks good, then hit CTRL-C to get out of it. Then type the following command to get out of the venv mode.
deactivateWe need to set up the Pi so it automatically starts the Radiosonde software when it boots up.
cd ~/radiosonde_auto_rx/auto_rx
sudo cp auto_rx.service /etc/systemd/system/
sudo systemctl enable auto_rx.service
sudo systemctl start auto_rx.service
Now reboot the Pi and we’ll see if things load automatically.
sudo rebootIt should only take a minute or two to reboot. Try loading your web interface as before to see you get a response. If not, log back into your Pi via SSH and run the command below to see if it mentions any errors.
sudo journalctl -u auto_rx.service -f -nI know that was a lot of commands, but it’s pretty fun once you get it all setup. If you have any questions about all this, please contact me. I have helped numerous people get these trackers configured and I’ll do my best to help you as well.
I also made a video which shows how I set everything up.